How to make a “well bucket” in case electricity goes down and you’re on well water
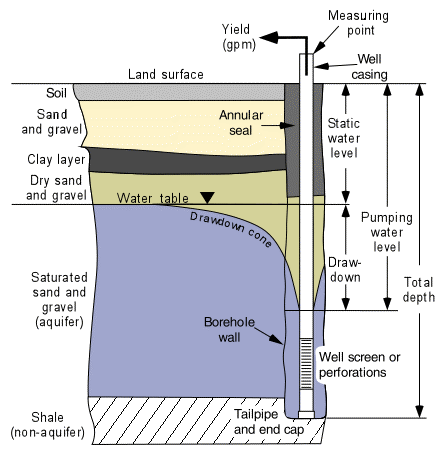
I have a 500 foot deep well. The pump is normally powered by solar, and if needed, a generator. But in case those power methods fail or SHTF and we run out of fuel, how would I get water?
I made this manual “well bucket” backup out of scrap pieces of PVC pipe, wood, cordage, a pulley and crank, some nuts and bolts, and a foot valve. It’s all available from a local hardware store or Amazon. I only needed simple hand tools and a power drill. Depending on how you put it together, it might be $25-$100.
It’s essentially like any bucket you’d drop into well for water, but this one is designed for modern, narrow, and deep wells. (This picture shows everything except for the foot valve on the bottom of the bucket/pipe:)
Although you can piece this together with random stuff, here’s a kit of essentially what I used and prices:
Step 1: Build a tripod or similar foundation that can hold a pulley directly over the wellhead. There’s no magic to the design, it just needs to be strong enough to handle 50-100 pounds of hanging force. In my case, the tripod is about 9 feet high and I can fold in the legs to make it easier to store.
But that might be overkill for your needs. If you’re really tight on storage space, you technically could skip the tripod and pulley/crank parts altogether and just have the PVC bucket and line.
Step 2: Attach a simple pulley wheel so it hangs down in the center.
Step 3: You can attach a hand crank to make drawing the bucket up easier. Or you can decide to skip this and just use your hands to pull the rope up. Keep in mind, though, that you might be pulling 20+ pounds up over hundreds of feet. It’s also possible to use an ATV, vehicle, or animal to pull the load up.
If you don’t attach the loose / non-bucket end of your line to a crank, as added safety against the whole thing dropping into your well, you can tie a big knot, attach some random nuts and washers, or some other idea to the end of the line. Whatever works so that if, while raising water by hand you accidentally let go, the whole thing won’t go down and you can’t reach the line anymore.
Step 4: Build the PVC bucket body. You need to know what the diameter of your well pipe is so that you can buy/use a PVC pipe that will fit inside but isn’t too narrow to require lots of round trips. It’s okay to leave a little bit of wiggle room between the PVC bucket and the well wall.
In my case, I used a 4 inch wide pipe that’s 4 feet long. If I did my math right, that pipe/bucket will carry about 2.5 gallons of water.
Step 5: Create the attachment point between the top of the bucket and your pulley line. The simplest way is to drill two holes directly across from each other, 1-2 inches below the top of the pipe, and then just thread your line through.
You can see how I used metal hardware in the picture above to create more of a pivot point that will let the bucket move and spare abrasion on the line. You could do something in between where you run one bolt through the two drilled holes, put a nut on one end to keep the bolt in place, and tie the line to the cross bolt.
Step 6: Making the bottom of the bucket. You have multiple options here, but in any case, you’ll need to put a PVC end cap on the bottom of the main bucket pipe to create the “floor” of the bucket. The end cap will be in the hardware store next to the PVC pipes, as will the glue you might need to secure it to the main body (remember, this bottom cap will hold all of the water weight). Just ask for help.
The simplest version is just a plain ‘ol bucket – the PVC pipe is the body, the bottom end cap is the floor, and there’s no top cap. So you dip the bucket fully underwater until it fills from the top, then pull it up.
There’s a potential problem with filling the bucket from the top, though. Your well might not have enough water in it for the whole bucket to submerge to the point water fills from the top. Or the bucket might be too light to naturally sink below the water line. If that happens, add some weight to the bottom of the bucket to help it sink.
I took an extra step to avoid those problems and have the water fill the bucket from the bottom, using a special (but only ~$20) device called a foot valve. The foot valve lets water come in from the bottom, but not back out as you pull up the bucket.
The white is the bottom PVC end cap. I drilled a hole in the center of that cap to match the foot valve and threaded it together. How you attach the foot valve (such as using washers/gaskets and a threaded nut) will depend on the foot valve, but again, your hardware store can help.
Another option is to buy or build a “check valve.” Some of the links below show this.
Practice: You’ll need to know how to remove the daily-life cap from your wellhead, or whatever else you’ll need to do in case power goes out and you need to swap in this manual method. Don’t wait until you actually need water to try this out!
Additional resources:
- https://www.benzinga.com/11/06/1199871/how-to-diy-well-bucket-using-pvc-pipe
- https://thevalleypiper.blogspot.com/2012/11/how-to-build-well-bucket.html
- https://www.youtube.com/watch?v=OrMBKePS4Xg
- https://www.youtube.com/watch?v=Eclhqf7BNlE
- https://www.youtube.com/watch?v=SERwTNJki10
-
Comments (9)
-


